> ## Documentation Index
> Fetch the complete documentation index at: https://docs.mayar.id/llms.txt
> Use this file to discover all available pages before exploring further.
# Balance
> See your active and pending balance in one page.
### Overview
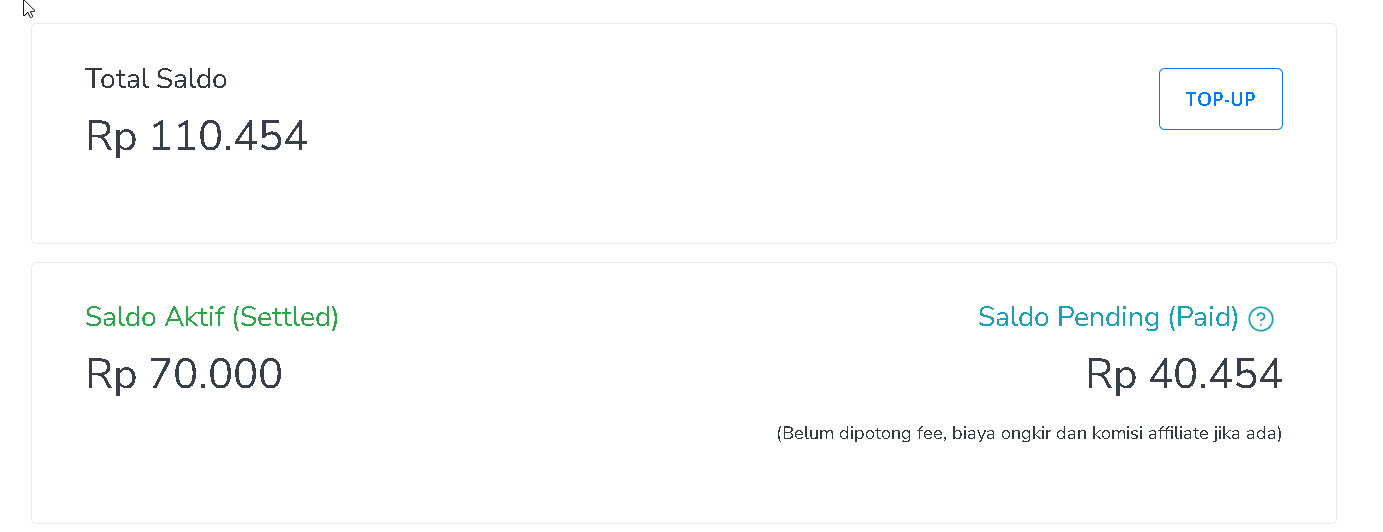
The Balance Page on the Mayar app is designed to give users a complete overview of their balance and financial activities. It shows up-to-date information about account balance, recent transactions, and visual expense analysis, making it easier to manage finances effectively.
### Short Explanation About Balance in MAYAR
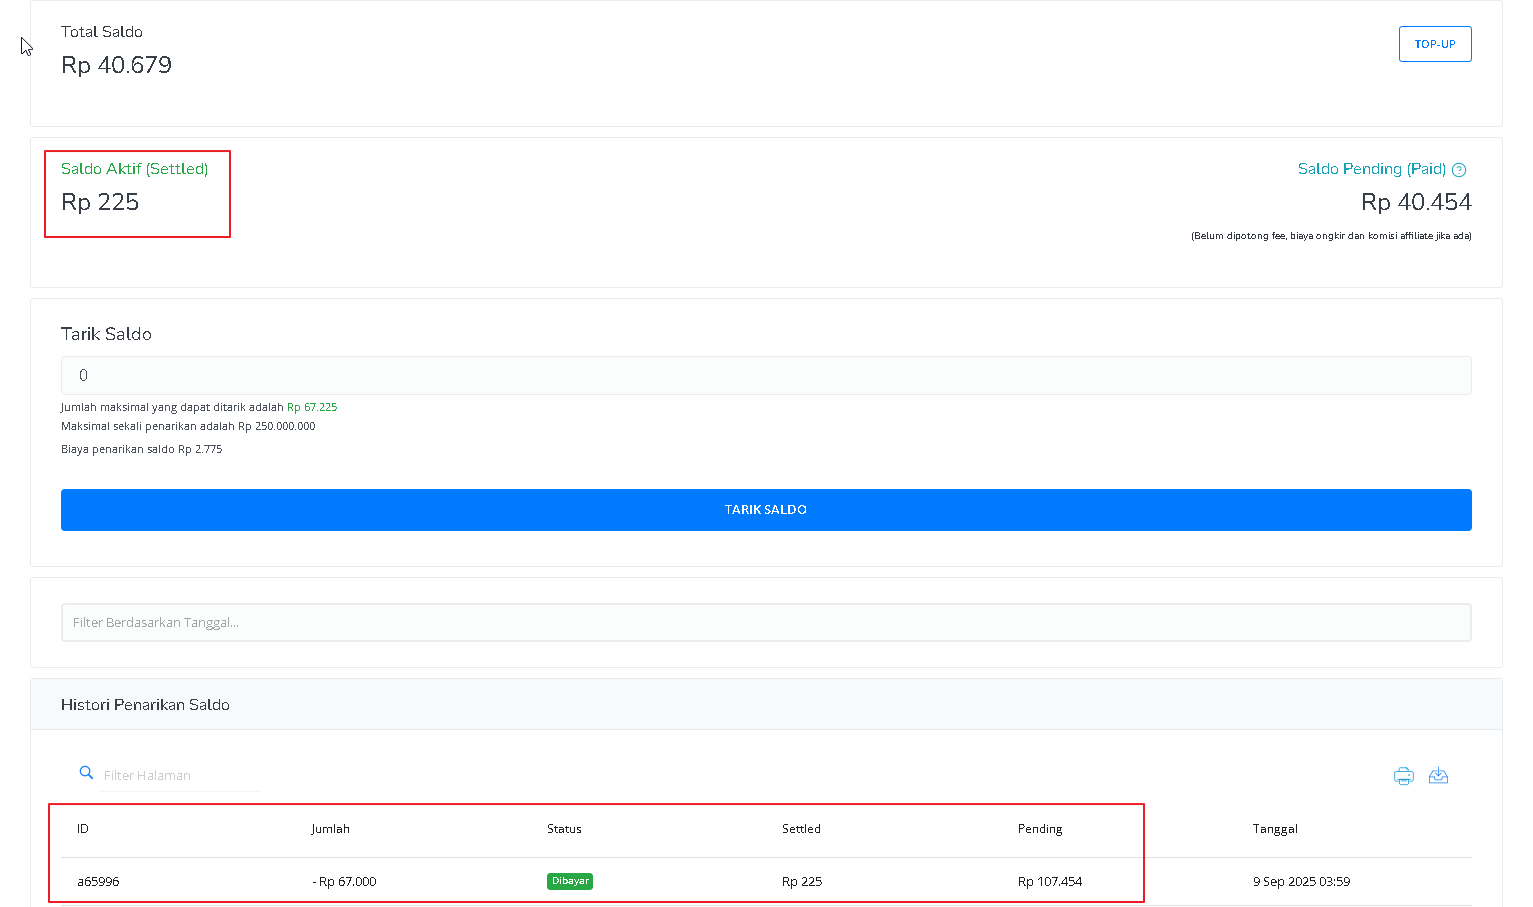
Active Balance: This is the amount of money available for you to use or withdraw anytime. It has passed all verification and clearance processes, so it’s ready to use.
Pending Balance: This is money from confirmed transactions that is still being processed by the payment channel (Bank, Credit Card Provider, Alfamart, Indomaret, or E-Wallet Provider) and is on the way to Mayar.
Settlement Time: This is the time it takes for a payment to move from “received” to “active balance.” The duration may vary depending on the payment method and the policies of the bank or payment provider. Typically, it can take from a few hours up to several business days.
### How to Withdraw Balance
Make sure you are logged into your account and on the main Dashboard page. This is where you’ll start the withdrawal process.
On the right sidebar of the Dashboard, find and click “Balance.” You’ll see two options: “Withdraw & Top Up” and “History.” Since you want to withdraw funds, select “Withdraw & Top Up.”
Ensure you’ve completed verification and linked your bank account beforehand. Enter the amount you want to withdraw in the “Withdraw Balance” field (note: the maximum withdrawal limit on Mayar is IDR 250 million). Once entered, click “Withdraw Balance.”

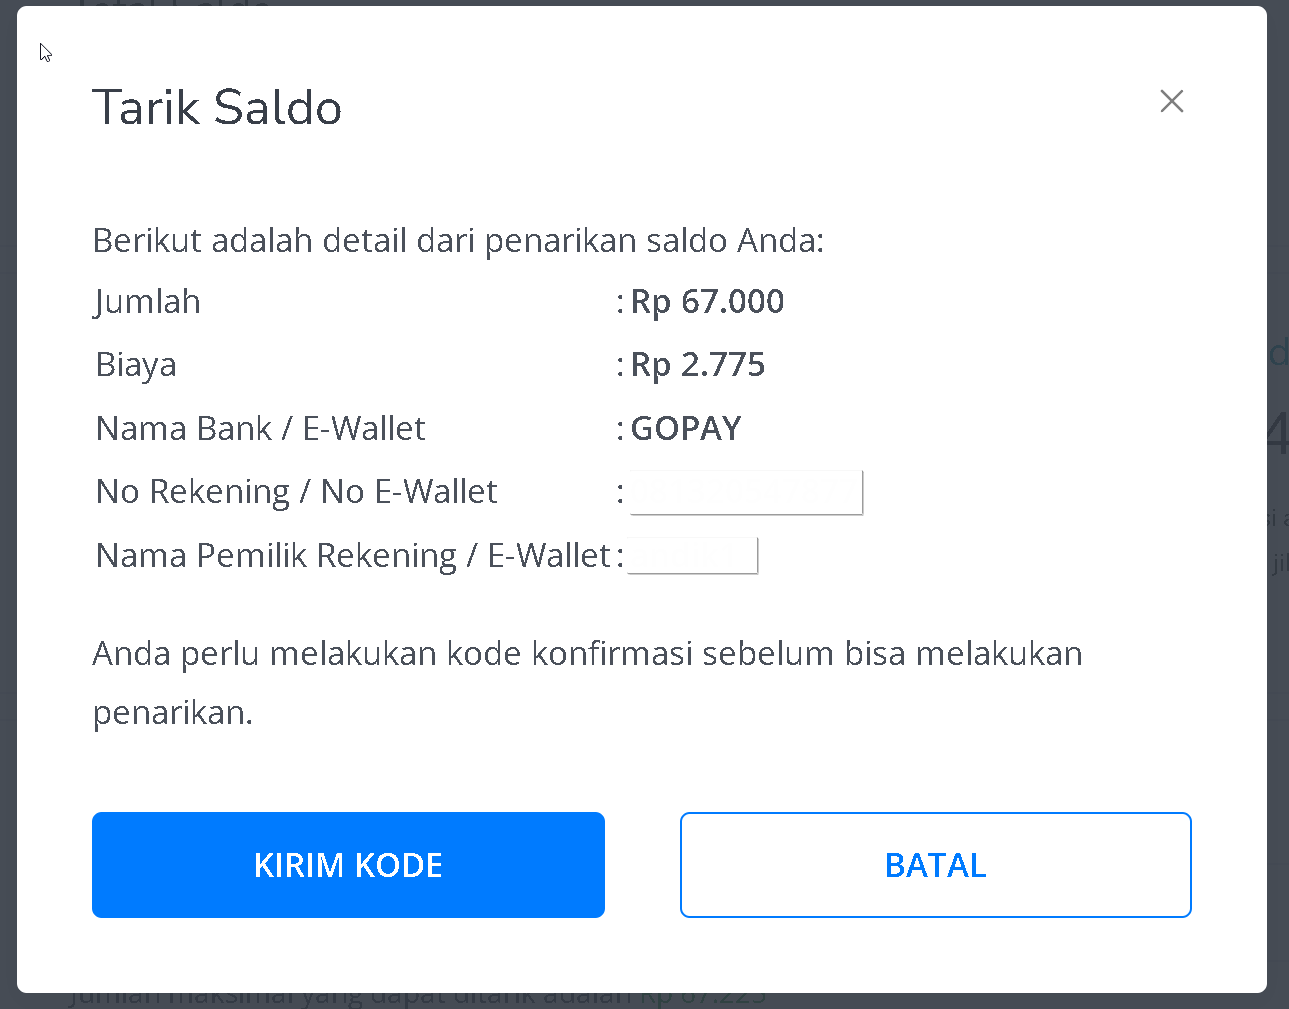
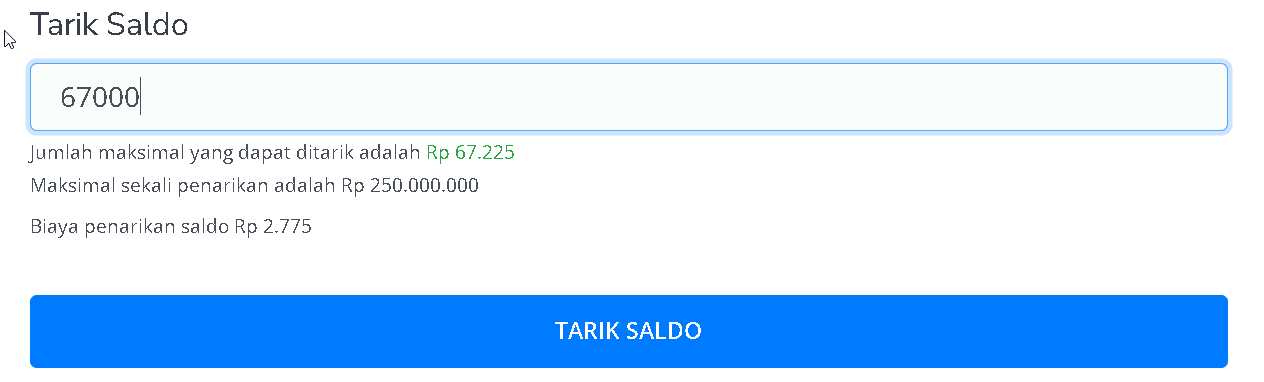 A confirmation pop-up will appear showing the withdrawal details, such as amount, fee, bank/E-Wallet name, account number, and account holder’s name. If everything looks correct, click “Send Code.”
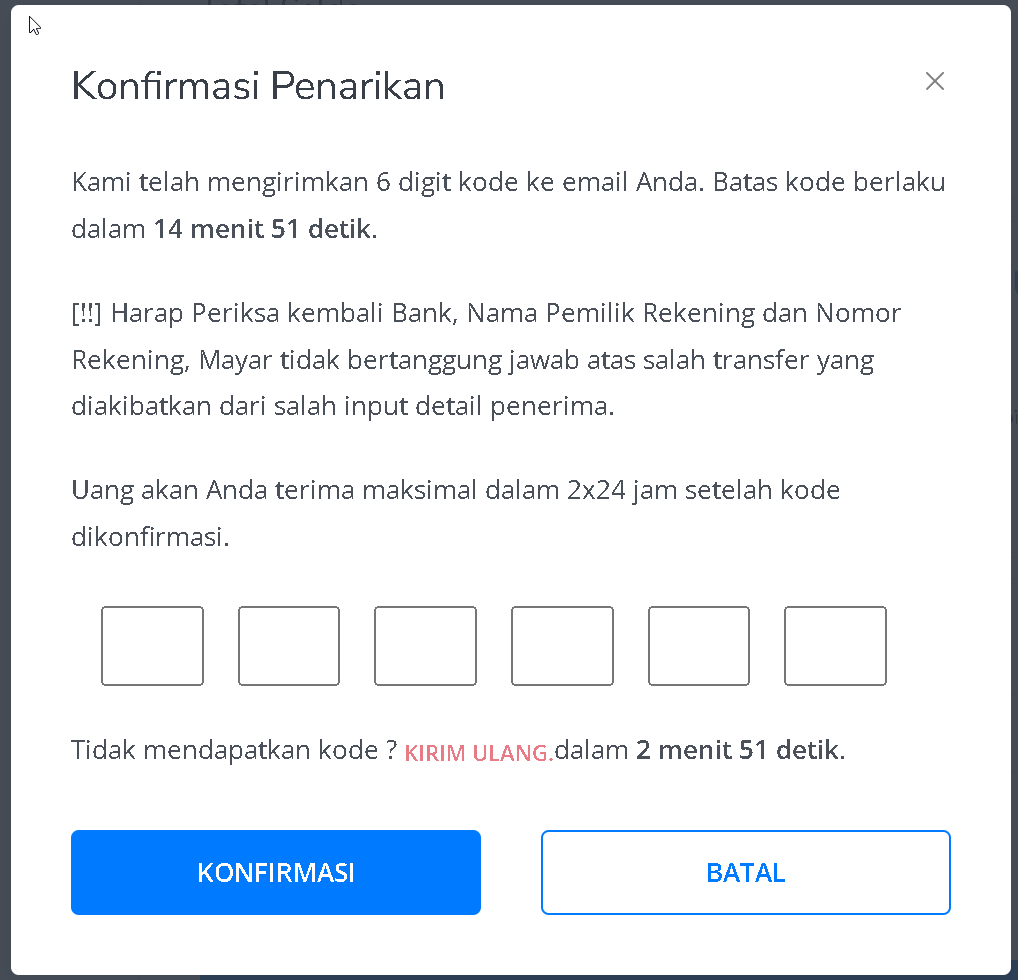
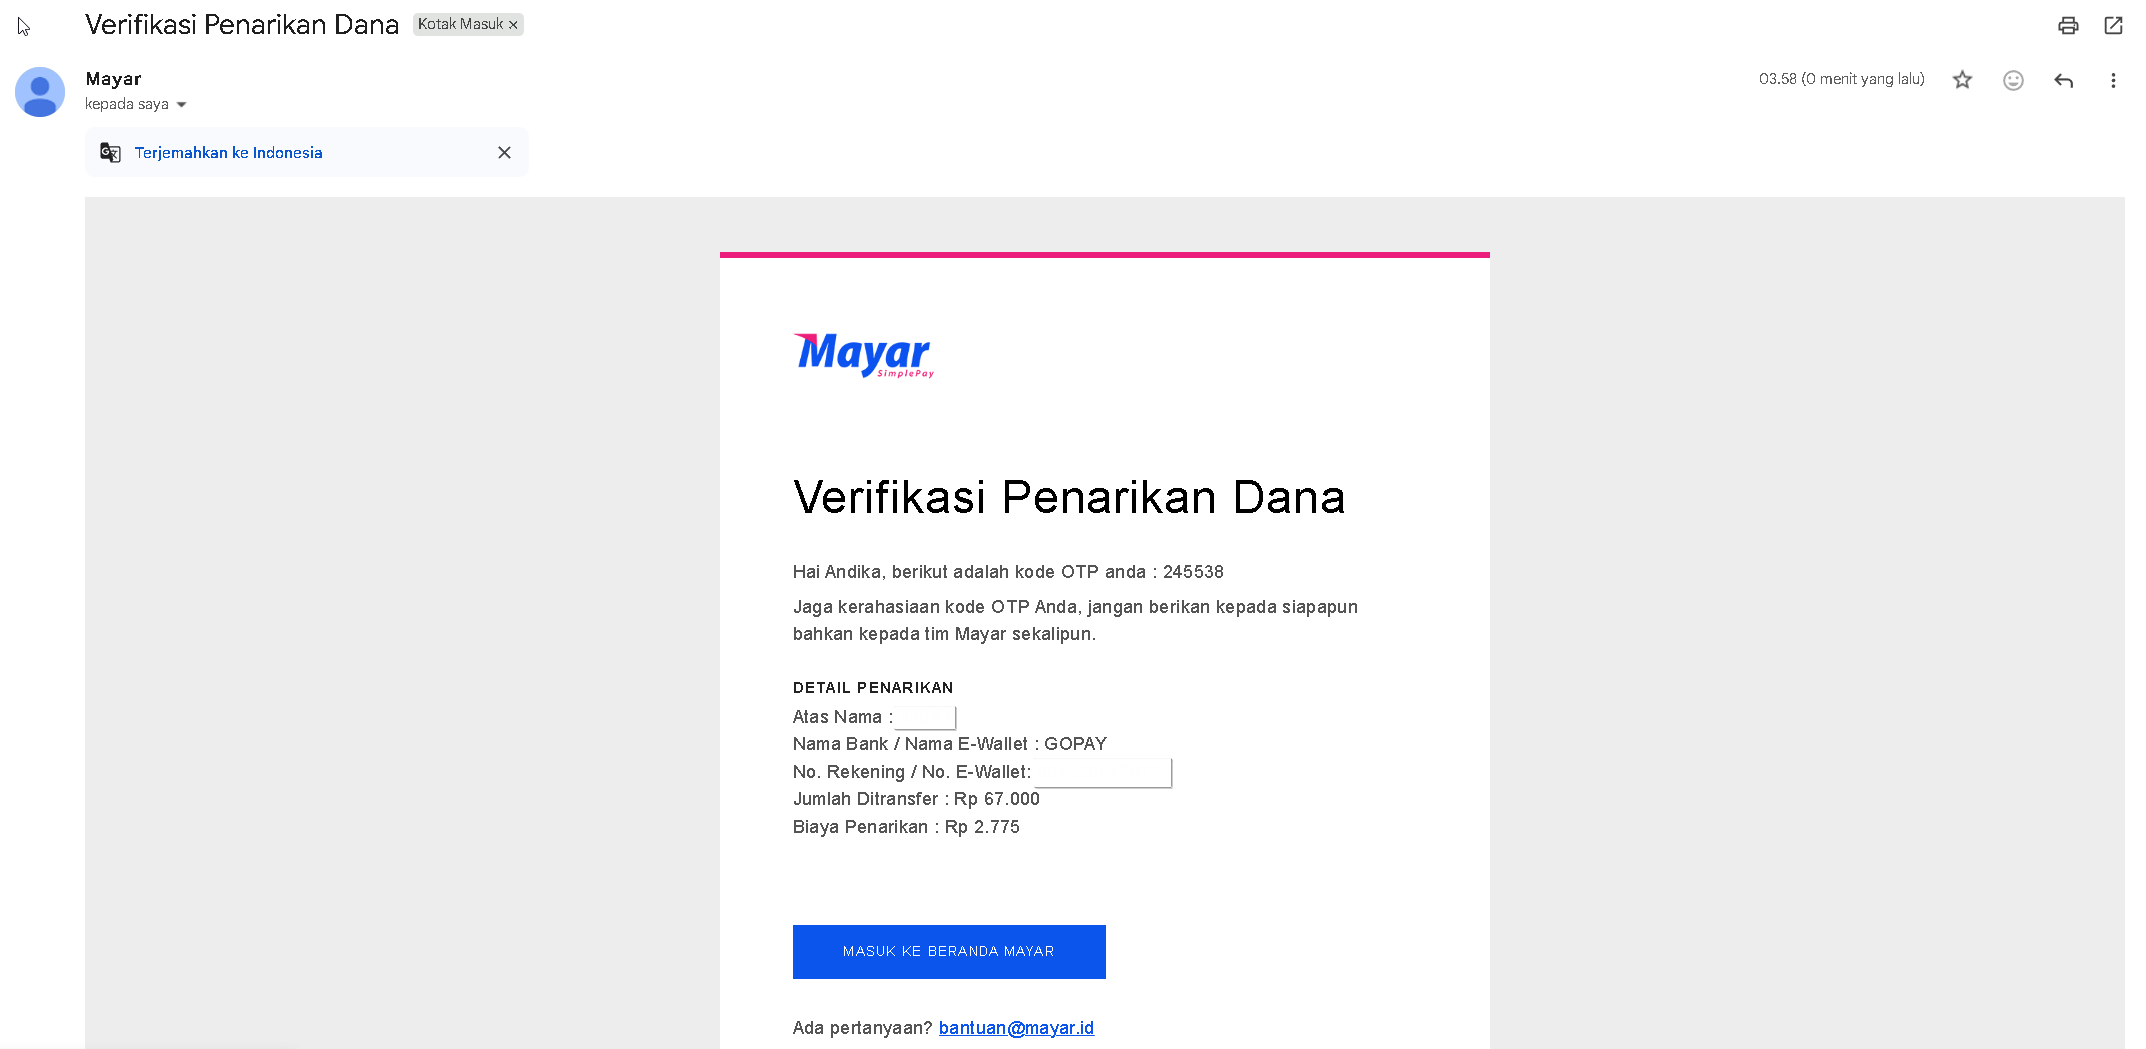
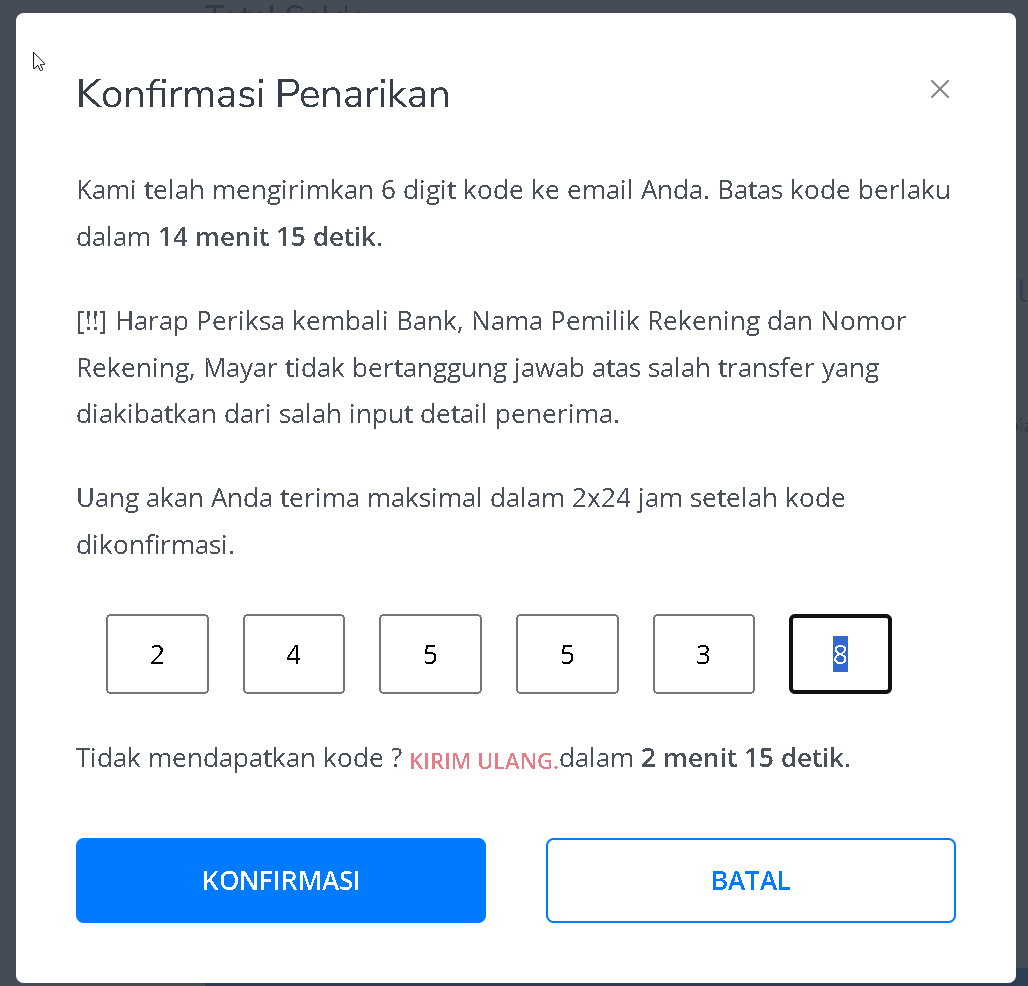
 You’ll be asked to enter a One-Time Password (OTP). The OTP will be sent to your email along with the withdrawal details for double-checking. Enter the OTP in the confirmation pop-up, then click “Confirm.”
 You can track the withdrawal status in the “Withdrawal History” section on the Balance page. If the status changes to “Paid,” congratulations! Your withdrawal was successful.
 ### How to Top Up Balance
Make sure you are logged into your account and on the main Dashboard page. This is where you’ll start the top-up process.
On the right sidebar of the Dashboard, click “Balance.” You’ll see two options: “Withdraw & Top Up” and “History.” Since you want to add funds, select “Withdraw & Top Up.”
### How to Top Up Balance
Make sure you are logged into your account and on the main Dashboard page. This is where you’ll start the top-up process.
On the right sidebar of the Dashboard, click “Balance.” You’ll see two options: “Withdraw & Top Up” and “History.” Since you want to add funds, select “Withdraw & Top Up.”
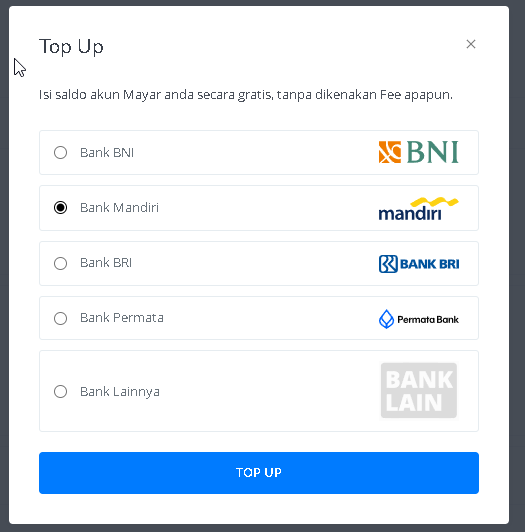
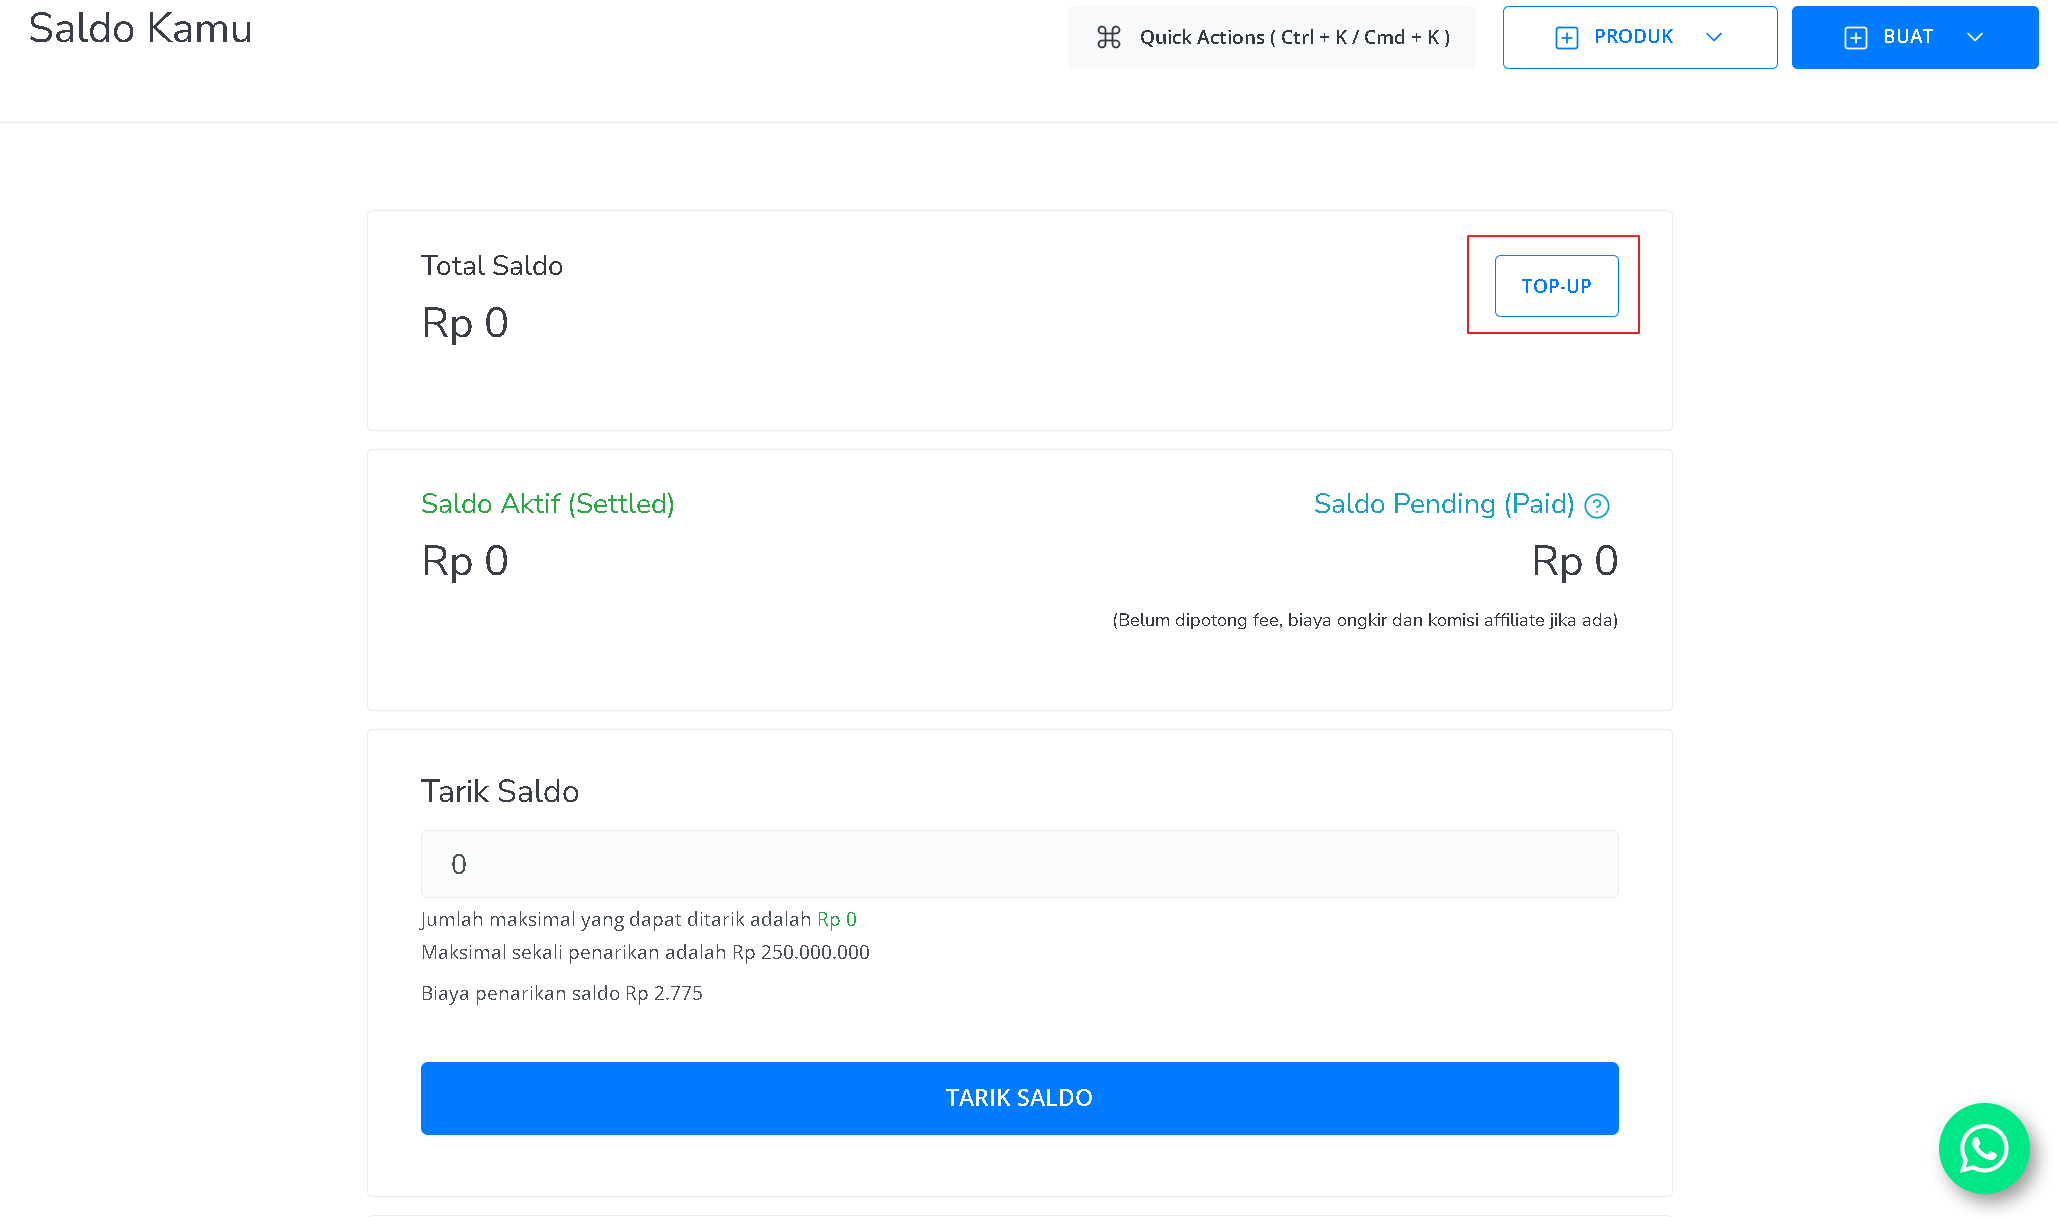 Before topping up, make sure your account is verified and your bank account is set up. Once ready, click the “Top Up” button located next to your total balance.
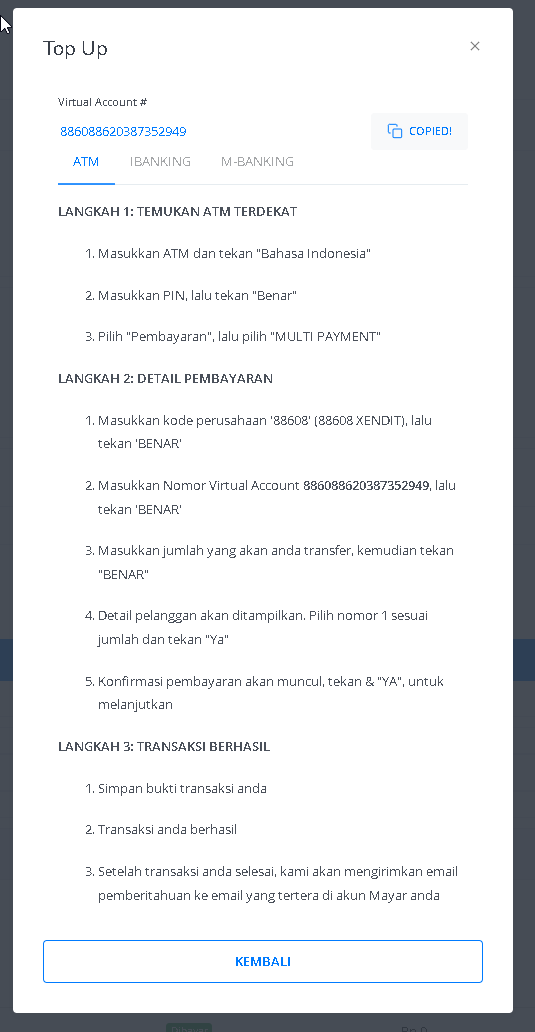
A “Top Up” window will appear where you can select your payment method, such as BNI, Mandiri, BRI, Permata Bank, and other banks. Complete the payment through your chosen bank and enter the amount you want to top up. Once the payment is completed, the transaction will be recorded in “History,” and your balance will increase.
Before topping up, make sure your account is verified and your bank account is set up. Once ready, click the “Top Up” button located next to your total balance.
A “Top Up” window will appear where you can select your payment method, such as BNI, Mandiri, BRI, Permata Bank, and other banks. Complete the payment through your chosen bank and enter the amount you want to top up. Once the payment is completed, the transaction will be recorded in “History,” and your balance will increase.